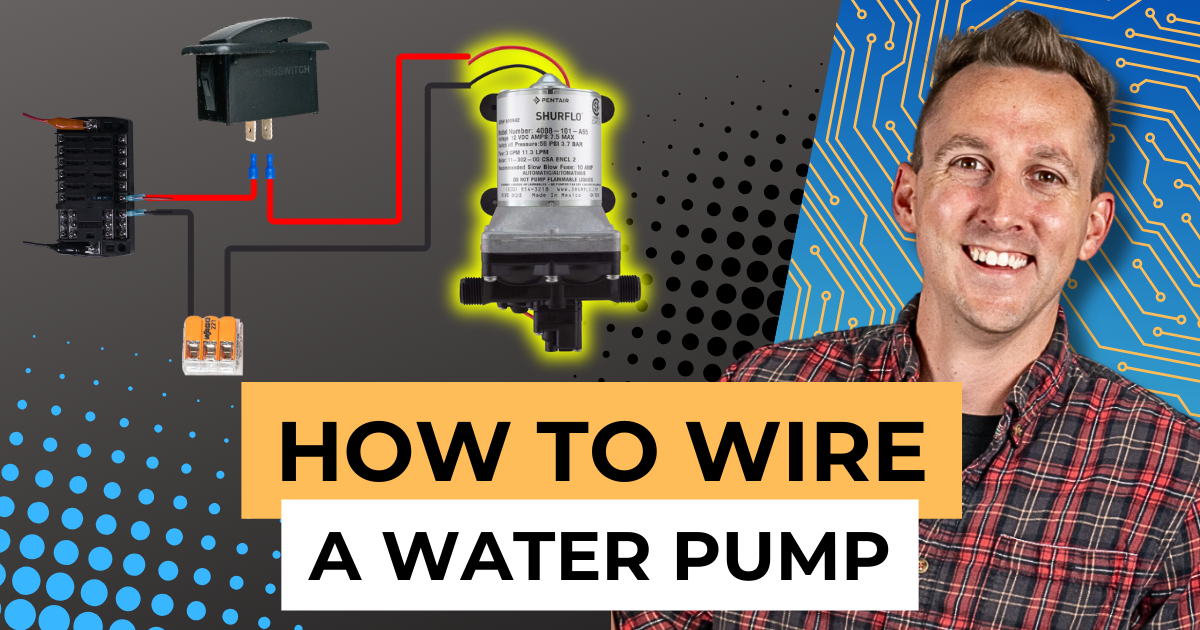
If you want running water in your camper van, installing a water pump is essential. In this guide, we’ll walk you through how to wire a water pump, as covered in lesson four of the Branch Circuit playlist from the EXPLORIST.life Mobile, Marine & Off-Grid Electrical Academy. Before you start, ensure you’re comfortable with basic wiring skills like cutting, stripping, and crimping wires. If you need a refresher, check out our earlier tutorials.

How to Wire a Water Pump – VIDEO
COMING SOON!
Prerequisites: Basic Wiring Skills
Before we jump into the tutorial, there are a couple of things you should already know. If you’re not familiar with basic wiring techniques—like cutting wire, stripping wire, and crimping terminals—I recommend checking out the Wire Terminals playlist in our Academy that covers these skills.
Tools & Equipment
For this demo, we’ll be using a Blue Sea Blade Fuse Block. There are several types of fuse blocks available, including models from Progressive Dynamics, Blue Sea Safety Hub, and Tiger Expedition UFO 200. While the specifics may vary, the connection method is essentially the same. You’ll also need a distribution hub—such as the Victron Lynx Distributor—to bring power from the battery, but we’re going to focus on the connections to the outlets for now.
Safety First
Before starting, always make sure your power is off. In this demo, we’ve already pulled the fuse from the fuse block to ensure there’s no power running through the wires while we work.
Step-by-Step Instructions
- Prepare Your Components: Start by disconnecting the fuse in your fuse block to avoid working with live wires. Identify the positive and negative wires on your water pump—in most cases, they’re red (positive) and black (negative).
- Install a Switch: For better control of your water pump, install a DC-rated toggle switch. This allows you to quickly turn off the pump in case of a water leak. Connect the positive wire from the fuse block to one terminal of the switch using a spade connector. The second terminal on the switch connects to the positive wire leading to the water pump. Position the switch in an easily accessible location.
- Connect Positive Wires: Run the positive wire from the switch to the water pump. Use lever nuts to secure connections. Flip the lever up, insert the wire, and flip the lever down to lock it in place. Double-check that the wires are fully seated, with no insulation interfering.
- Connect Negative Wires: Run the negative wire from the fuse block to the water pump. Lever nuts can also be used here for flexibility and ease of connection. Ensure all connections are secure and visually inspected.
- Reconnect the Fuse: Once all wiring is complete and checked, reinsert the fuse into the fuse block to restore power. Test the system by turning the switch on and observing the water pump’s operation.

Tips for Use
- Turn off the switch when the pump isn’t actively needed, such as when you’re not using the sink or shower. This prevents accidents and conserves power.
- Position lever nuts and switches in convenient, accessible locations for easier maintenance and operation.
That’s all there is to wiring a water pump! With just a few simple steps, you can ensure reliable running water in your camper van. In the next tutorial, we’ll show you how to wire a refrigerator. Stay tuned!
