If you want to charge your phone from your electrical system, you’ll need a USB or 12-volt outlet, and that’s exactly what we’re covering in this lesson. We’ll walk through how to properly wire outlets using fuse blocks, lever nuts, and spade connectors so you can safely and efficiently power your devices. Whether you’re setting up a single USB outlet or multiple 12-volt outlets, this guide will show you the step-by-step process to get it done right.

How to Wire USB & 12V Outlets – VIDEO
Prerequisites: Basic Wiring Skills
Before we jump into the tutorial, there are a couple of things you should already know. If you’re not familiar with basic wiring techniques—like cutting wire, stripping wire, and crimping terminals—I recommend checking out the Wire Terminals playlist in our Academy that covers these skills. Once you have those basics under your belt, you’ll be ready to wire up USB and 12-volt outlets like a pro.
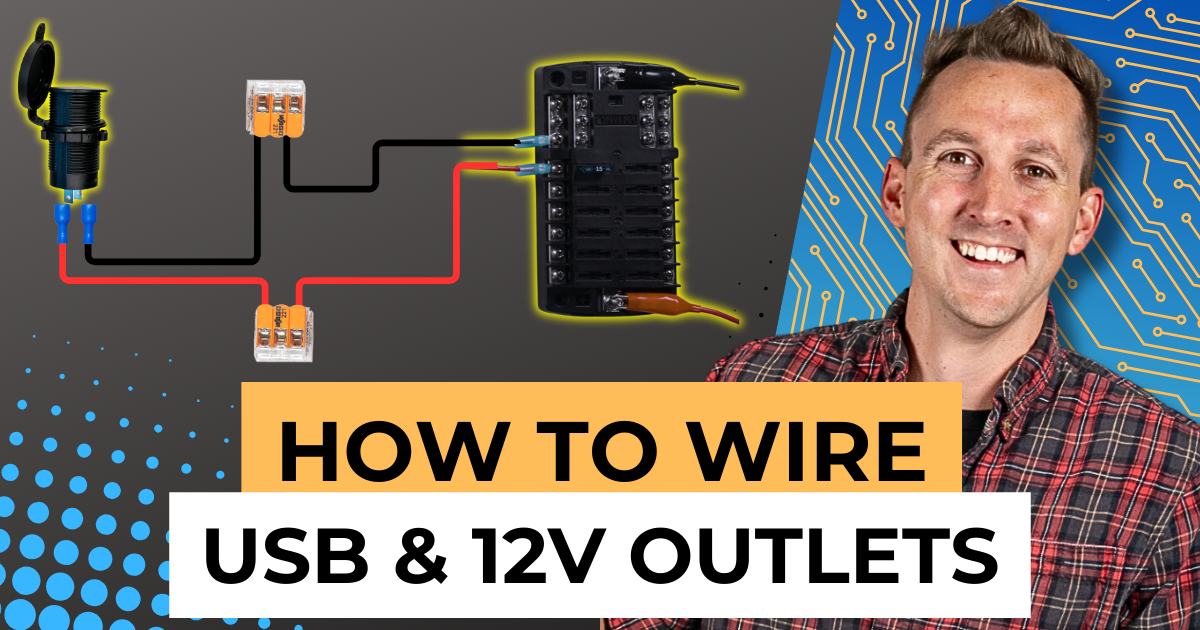
For this demo, we’ll be using a Blue Sea Blade Fuse Block. There are several types of fuse blocks available, including models from Progressive Dynamics, Blue Sea Safety Hub, and Tiger Expedition UFO 200. While the specifics may vary, the connection method is essentially the same. You’ll also need a distribution hub—such as the Victron Lynx Distributor—to bring power from the battery, but we’re going to focus on the connections to the outlets for now.
Safety First
Before starting, always make sure your power is off. In this demo, we’ve already pulled the fuse from the fuse block to ensure there’s no power running through the wires while we work.
Step-by-Step: Wiring the First Outlet
Let’s start by wiring the first outlet. For this example, we’re connecting a USB outlet, but the process is similar for 12-volt outlets.
1. Preparing the Fuse Block
We’re starting with a Blue Sea Fuse Block, with the positive wire connected to the positive terminal and the negative wire connected to the negative busbar. With the fuse removed, we can safely proceed.

2. Using Lever Nuts for Connections
To make our wiring easier, we’ll use lever nuts. These little devices have levers that flip up, allowing us to insert the stripped wire, then flip the lever back down to secure the wire. They make wiring much more flexible and easier to manage, especially when you’re adding multiple outlets or circuits.
- Step 1: Connect the stripped end of your negative wire to the negative lever nut.
- Step 2: Do the same with your positive wire.

3. Connecting Wires to the Outlet
Now that the wires are secured to the lever nuts, we can connect them to the actual outlet. For USB outlets, this means connecting a positive and negative wire to their respective terminals on the back of the outlet with spade connectors. Take note of the labeling on the back of the outlet—positive and negative sides are often marked, but you’ll want to double-check.
- Step 1: Insert the stripped positive wire (red) into the lever nut, and then connect the spade connector end to the positive terminal.
- Step 2: Do the same with the negative wire (black)

4. Testing the Connection
Once the wires are connected, put the fuse back into the fuse block, flip the power back on, and test your connection. If everything’s wired correctly, you should see a working USB outlet that’s ready to charge your devices.
Adding More Outlets
Now that we’ve connected our first outlet, what if you want to add a second USB or 12-volt outlet? It’s simple! Here’s how:
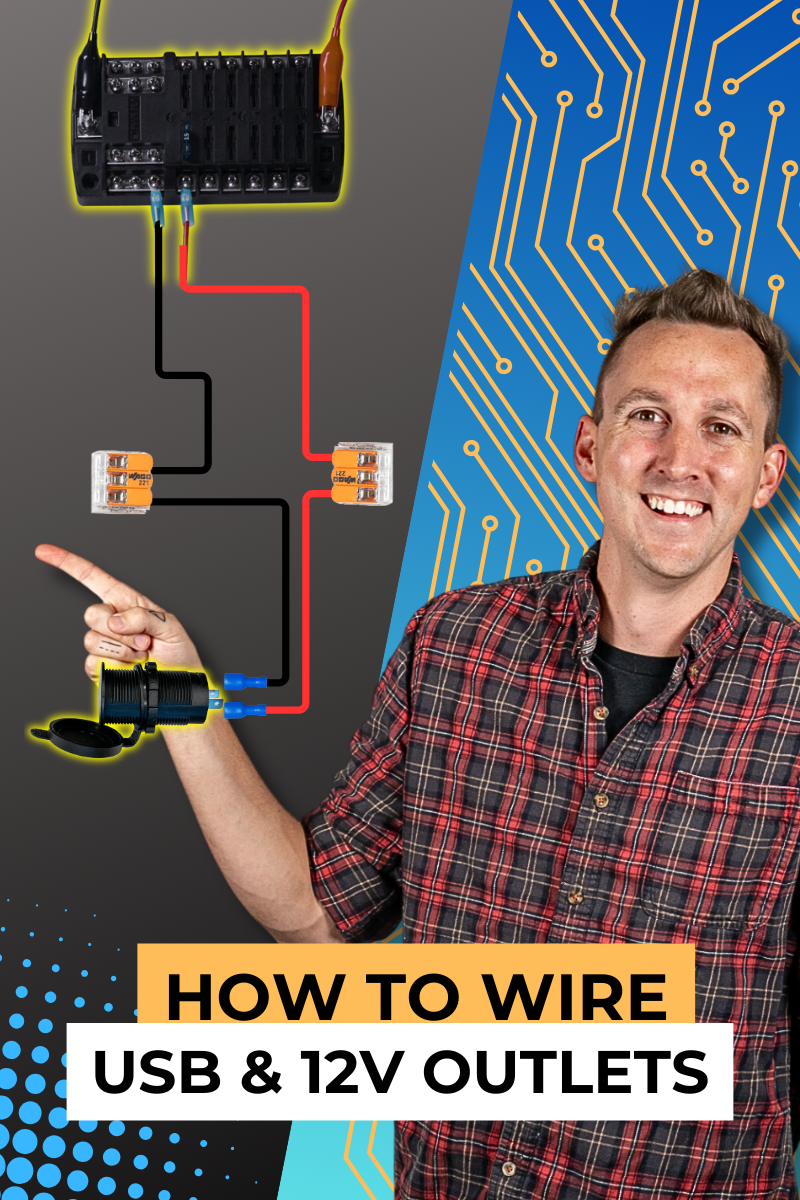
1. Prep Longer Wires
For the second outlet, you’ll need longer wires. We’ve already stripped the ends of these, and now we’ll add lever nuts just like we did for the first one.
- Step 1: Connect the negative wire to the negative lever nut and the positive wire to the positive lever nut.
- Step 2: Run the wires to the location where you want your second outlet.
2. Wire the Second Outlet
Once the wires are in place, we’ll wire up the second outlet. Just like before:
- Step 1: Insert the positive wire into the positive terminal of the outlet.
- Step 2: Insert the negative wire into the negative terminal.

3. Test the Second Outlet
Now, double-check that everything is secure, and pop the fuse back in to test the second outlet. If everything is correct, you’ll have a second working USB or 12-volt outlet!
Why Use Lever Nuts?
You may be wondering, are lever nuts absolutely necessary? Not really. They’re a convenience, especially for someone who wants flexibility in their setup. You can crimp your spade connectors directly to the wire ends and attach them to the outlet terminals instead. But I prefer lever nuts because they allow you to easily add more outlets or circuits later on without much hassle. It’s a personal preference, so feel free to use whatever method works best for you.

USB vs. 12-Volt Outlets
It’s important to note that the wiring methods for USB outlets and 12-volt outlets are essentially the same. The primary difference is the wire size: you may need thicker wire for 12-volt outlets depending on the load calculations for your system. But both types of outlets follow the same basic principles for making the physical connections.
Wrapping Up
Now you know how to wire USB and 12-volt outlets to your off-grid, marine, or mobile electrical system. These outlets are incredibly useful for charging phones, tablets, and other devices, and setting them up properly will ensure you have reliable power wherever you go.
Remember, once you have one outlet wired, you can repeat the process to add more outlets as needed. Whether you’re working with a boat, RV, or off-grid cabin, having USB and 12-volt outlets connected correctly is a game changer.